
钎焊基本原理
您遇到钎焊方面的问题吗?或需要我们推荐合适的钎焊产品吗?欢迎和我们联系!
鲁科斯钎焊材料(苏州)有限公司
中国 江苏省苏州市苏州工业园区星龙街428号苏春工业坊标准厂房8B
手 机:18862195523
Email:ABian@lucasmilhaupt.com WeChat:bxc615
手 机:13580355062
Email: KCheng@lucasmilhaupt.com
手 机:18660285329
Email:Lli@lucasmilhaupt.com
手 机:13512375105
Email:WWei@lucasmilhaupt.com
电话:15862440316
Email:Jxia@lucasmilhaupt.com
电 话:0512-62891510-215
Email:CFang@lucasmilhaupt.com
The fifth step is the actual accomplishment of the brazing joint. It involves heating the assembly to brazing temperature, and flowing the filler metalthrough the joint.
Brazing Heating Methods
There are four main types of brazing heating methods: torch or manual brazing, induction brazing, resistance brazing, and vacuum brazing. The heating method most commonly used in brazing a single assembly is the hand held torch, therefore most of this guide will focus on manual brazing practices and principles. However, if you need assistance with furnace brazing, please see our furnace atmosphere blog.
First, apply heat broadly to the base metals. If you’re brazing a small assembly, you may heat the entire assembly to the flow point of the brazing filler metal. If you’re brazing a large assembly, you heat a broad area around the joint.
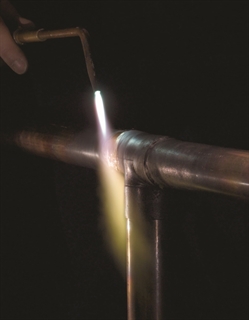
All you have to keep in mind is that both metals in the assembly should be heated as uniformly as possible so they reach brazing temperature at the same time. When joining a heavy section to a thin section, the “splash-off” of the flame may be sufficient to heat the thin part. Keep the torch moving at all times. When joining heavy sections, the flux may become transparent—which is at 1100°F (593°C)—before the full assembly is hot enough to receive the filler metal.
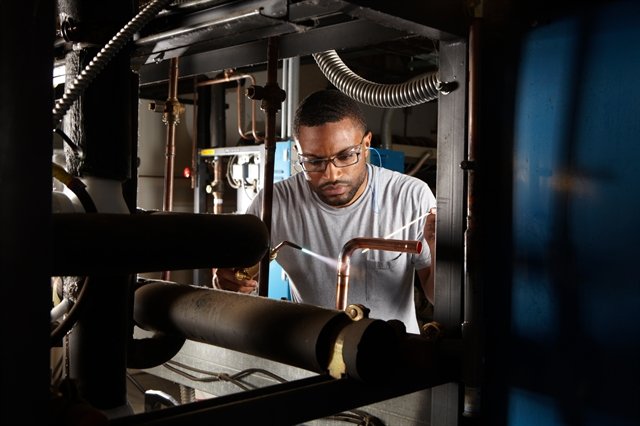
In torch brazing, a variety of fuels are available—natural gas, acetylene, propane, propylene, etc., combusted with either oxygen or air. The most popular is still the oxy/acetylene mixture. When it comes to safely brazing with oxy-acetylene torches, let's look at two important aspects: safety equipment, plus procedures for safe operation. This is serious business: arc rays and sparks can result in loss of sight, fume inhalation can lead to lung damage, and other accidents can cause burns, fires, or explosions.
Oxy-acetylene Torch Safety Equipment
In addition to gloves, eye protection, and related safety gear, these are the important elements:
Cylinders - Oxygen and acetylene are kept in separate cylinders and not combined until the torch tip is ignited. Oxygen cylinders, typically painted green, contain oxygen compressed up to 2,200 psi (pounds per square inch). Oxygen is a stable compound by nature, but any oil or grease which comes in contact with the oxygen will burst into flames. Therefore, keep hands and gloves free of these materials before handling cylinders. Acetylene gas cylinders are compressed at only about 250 psi, which is much lower than oxygen tanks. However, unlike oxygen, acetylene is rather unstable and, therefore, should not be introduced into the torch above 15 psi. As an extra precaution, cylinder valves should be open no more than 1.5 turns, in the event an operator must close a valve quickly.
Regulators - Installed on the cylinder, regulators control both the pressure of the cylinder and the outlet pressure leading to the torch. Turn keys or knobs on the regulators allow adjustment of the outlet pressure. Again, the setting should be no more than 15 psi for acetylene. Consult the torch manufacturer for proper pressure settings for acetylene and oxygen.
Check Valves - From the regulator, the two gases travel through check valves, which ensure that the gases can be shut off in the event of backflow.
Alternatively, check valves can be placed between the gas hoses and the torch. Please note that check valves can stop reverse gas flow, but they cannot stop flame in the event of a flashback.
Flashback Arrestors - Flashback arrestors prevent fire from flowing back into the cylinders, which will otherwise lead to an explosion. Flashback arrestors contain cut-off valves with low melting points. When triggered by flame, they readily shut off the gas supply and thus extinguish the flame. Both check valves and flashback arrestors should be tested or changed regularly to ensure they are working properly.
Oxy-acetylene Torch Safe Operation
In addition to using safety equipment, workers should practice safe operation to prevent flashbacks. Keep acetylene and oxygen separate until the torch is ignited. When starting a torch, the acetylene valve should be opened first. Next, the torch should be ignited, and then oxygen can be introduced. Please note that opening both gas valves prior to ignition can cause gas backflow into either gas hose, leaving the system vulnerable to flashback.
After use, it is critical that both gas lines be emptied separately-one at a timethrough the torch. If this "bleeding" of gas lines is done simultaneously for oxygen and acetylene, any pressure difference between the gas lines will cause backflow of one gas into the other line, so this should be avoided.
Flashbacks can also be caused by brazing with multiple torches, simultaneously, on one part. If using dual torches to heat both sides of a part, do not aim the torches at each other, but rather, angle each torch toward the part. If one torch should cause flashback in the other, operators will hear a loud hissing sound and should immediately turn off the gas by closing first the acetylene valve and then the oxygen valve.
Flux Changes During Brazing Process
Some metals are good conductors—and consequently carry off heat faster into cooler areas. Others are poor conductors and tend to retain heat and overheat readily. The good conductors will need more heat than the poor conductors, simply because they dissipate the heat more rapidly.
In all cases, your best insurance against uneven heating is to keep a watchful eye on the flux. If the flux changes in appearance uniformly, the parts are being heated evenly, regardless of the difference in their mass or conductivity.
Depositing Filler Metals
You’ve heated the assembly to brazing temperature. Now you are ready to deposit the filler metal.
In manual brazing, all this involves is carefully holding the rod or wire against the joint area. The heated assembly will melt off a portion of the filler metal, which will instantly be drawn by capillary action throughout the entire joint area.
You may want to add some flux to the end of the ller metal rod— about 2” to 3” (51 mm to 76 mm)— to improve the flow. This can be accomplished by either brushing on or dipping the rod in flux. On larger parts requiring longer heating time, or where the flux has become saturated with much oxide, the addition of fresh flux on the filler metal will improve the flow and penetration of the filler metal into the joint area.
However, there is one small precaution to observe. Molten brazing filler metal tends to flow toward areas of higher temperature. In the heated assembly, the outer base metal surfaces may be slightly hotter than the interior joint surfaces. So take care to deposit the filler metal immediately adjacent to the joint. If you deposit it away from the joint, it tends to plate over the hot surfaces rather than flow into the joint. In addition, it’s best to heat the side of the assembly opposite the point where you’re going to feed the filler metal. In the example above, you
heat the underside of the larger plate, so that the heat draws the filler metal down fully into the joint. (Always remember—the filler metal tends to flow toward the source of heat.)
General Safety In Brazing
In brazing, there is always the possibility of dangerous fumes and gases rising from base metal coatings, zinc and cadmium-bearing filler metals, and from fluorides in fluxes. The following well-tested precautions should be followed to guard against any hazard from these fumes.
1. Ventilate confined areas: Use ventilating fans and exhaust hoods to carry all fumes and gases away from work, and air supplied respirators as required.
2. Clean base metals thoroughly: A surface contaminant of unknown composition on base metals may add to fume hazard and may cause a too rapid breakdown of flux, leading to overheating and fuming.
3. Use sufficient flux: Flux protects base metals and filler metal during the heating cycle. Full flux coverage reduces fuming. Also, consult your SDS regarding specific hazards associated with brazing flux.
4. Heat metals broadly: Heat the base metals broadly and uniformly. Intense localized heating uses up flux, increases danger of fuming. Apply heat only to base metals, not to filler metal. (Direct flame on filler metal causes overheating and fuming.
5. Know your base metals: A cadmium coating on a base metal will volatilize and produce toxic fume during heating. Zinc coatings (galvanized) will also fume when heated. Learn to recognize these coatings. It is recommended that they be removed before parts are heated for brazing.
6. Know your filler metal: Be especially careful not to overheat assembly when using filler metals that contain cadmium. Consult Pages 34-37 or the Safety Data Sheet (SDS) for maximum recommended brazing temperatures of a specific filler metal. The filler metal carries a warning label. Be sure to look for it and follow the instructions carefully.