钎焊基本原理
钎焊基本原理
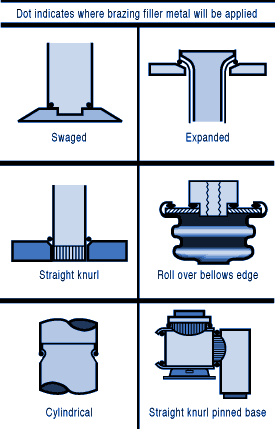
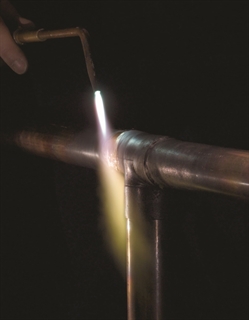
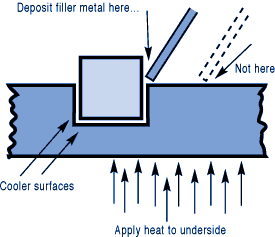
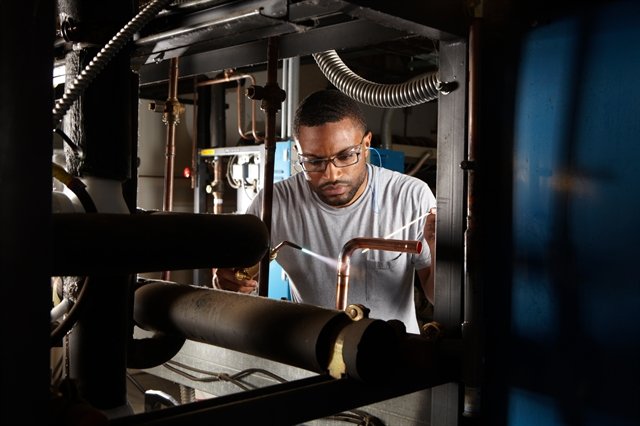
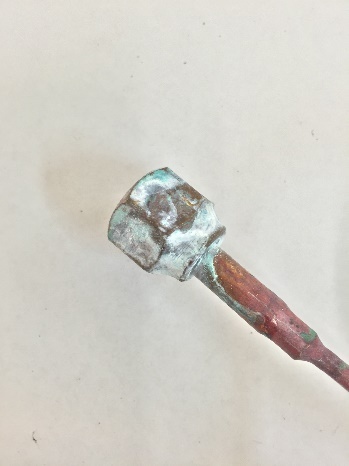
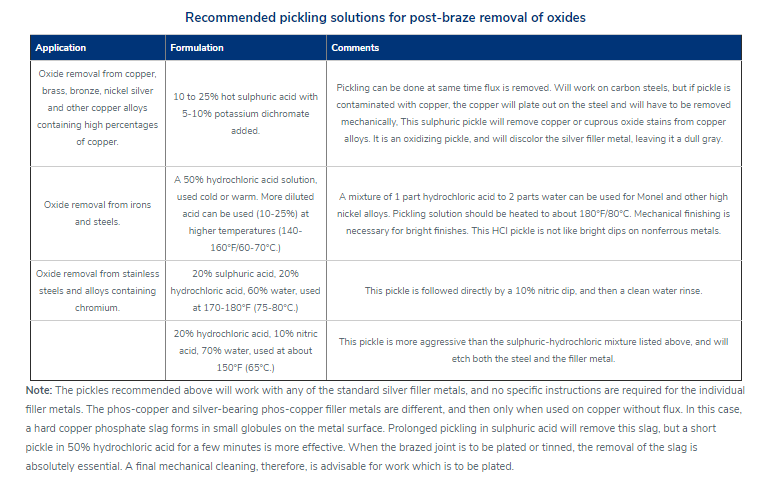
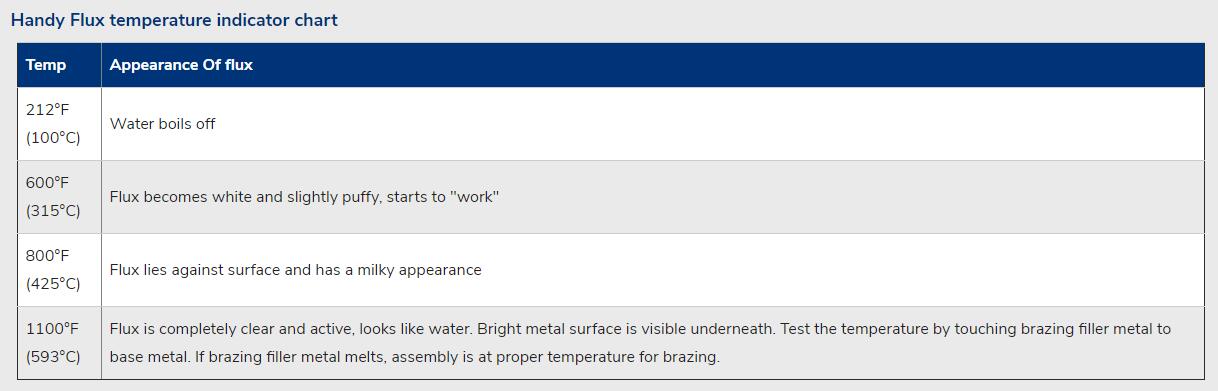
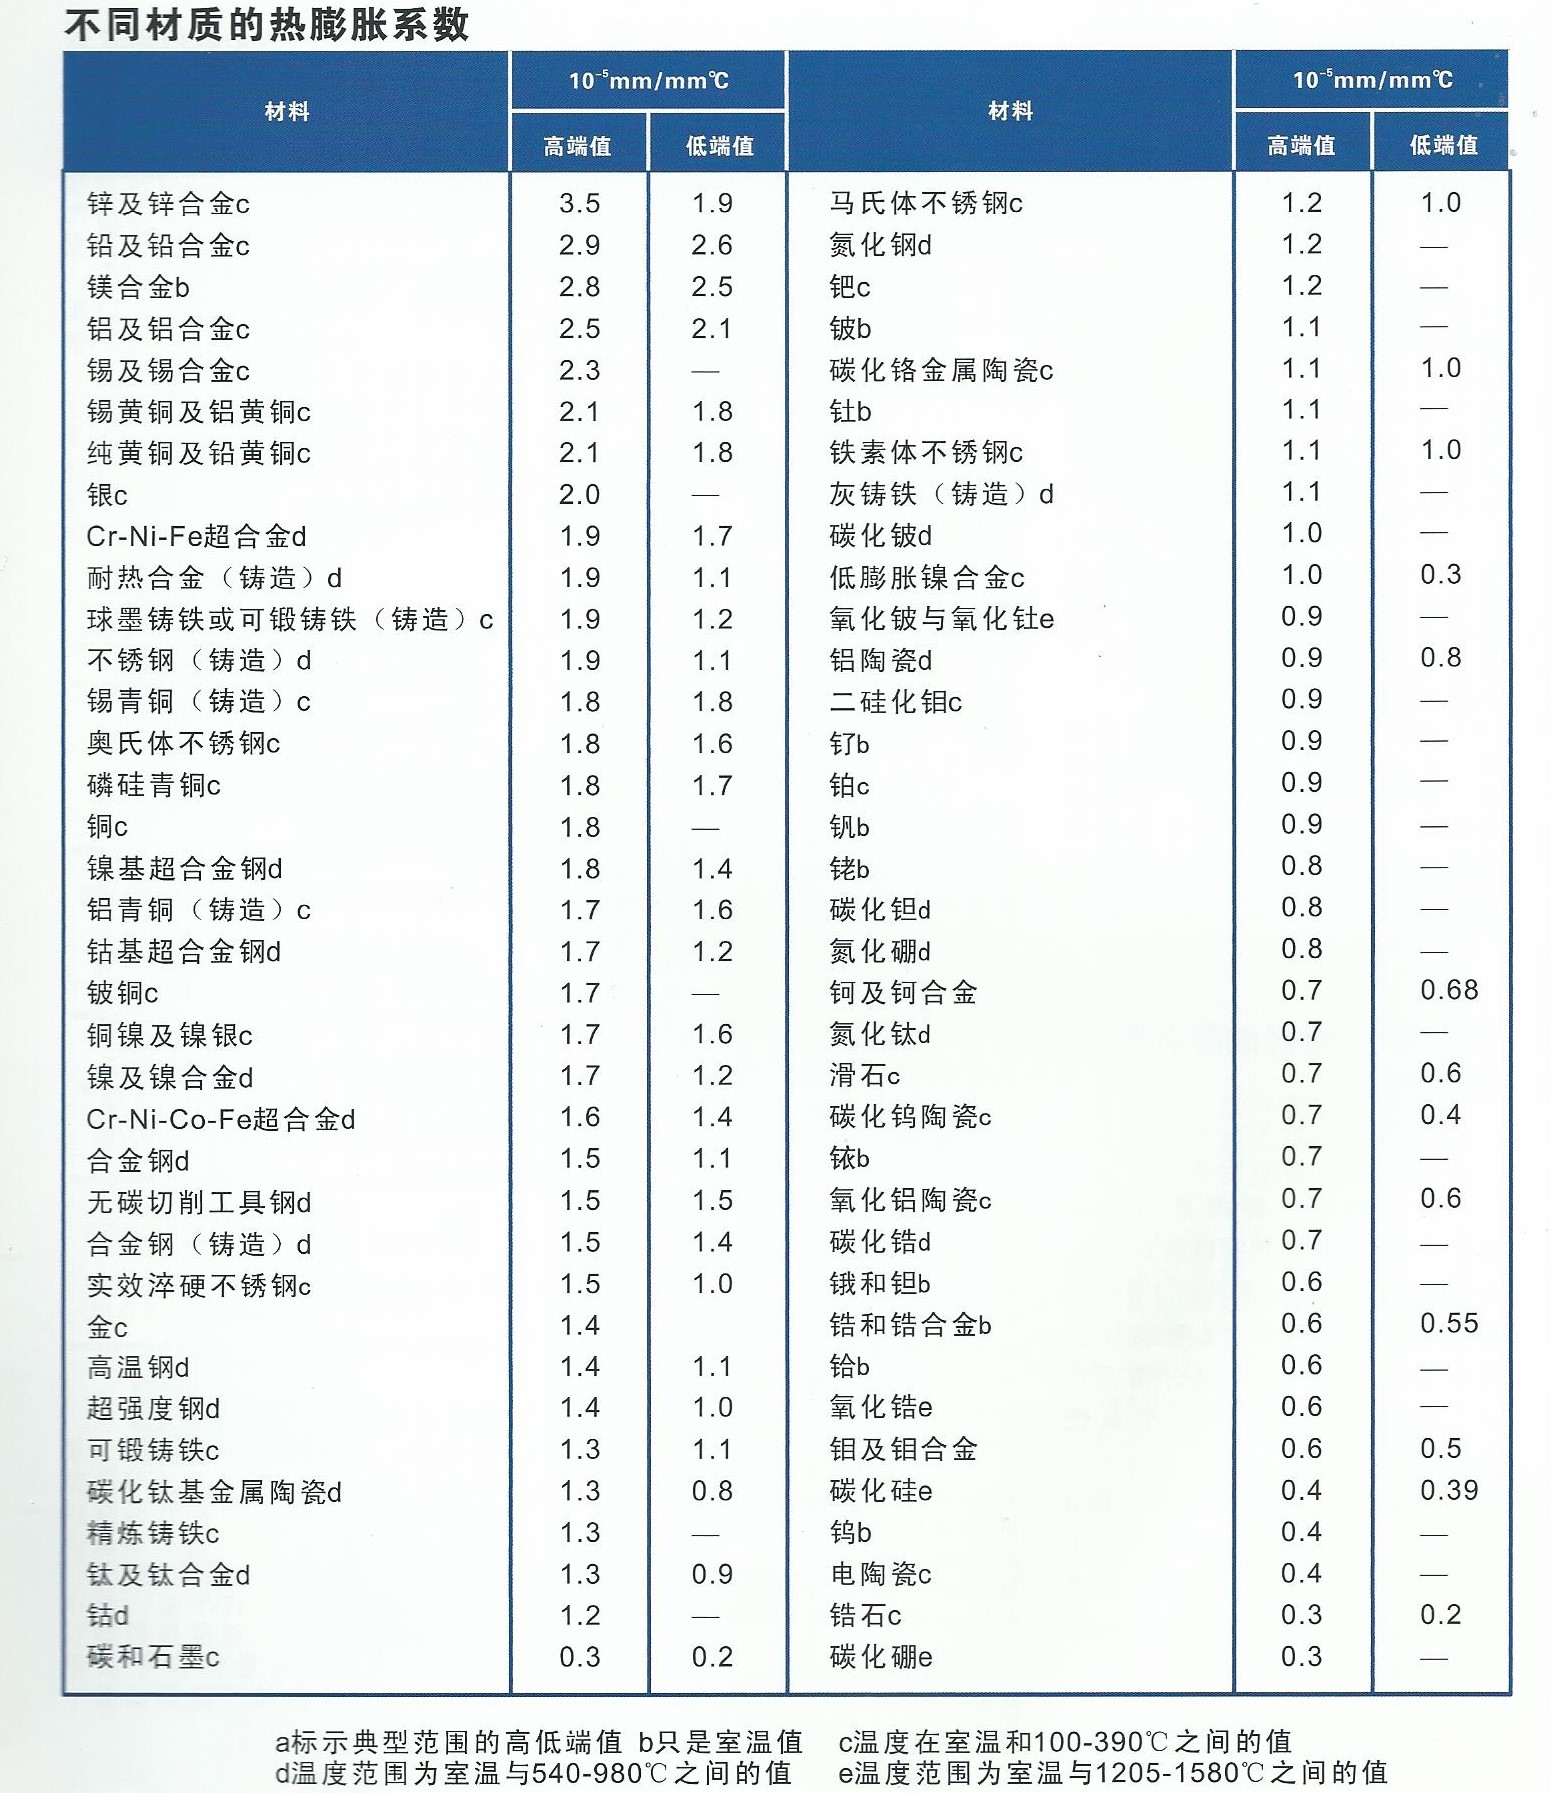
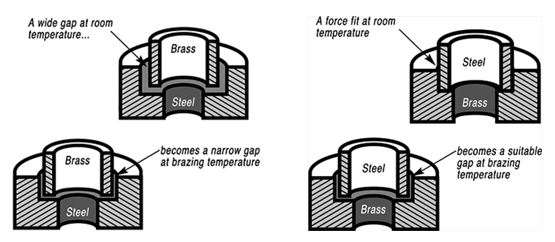
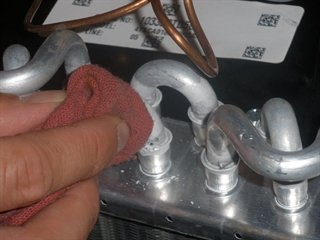
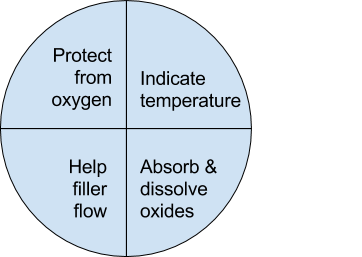
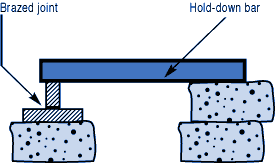
钎焊非常适合异种材料的连接,同时钎焊的温度也相对较低。钎焊接头的形成,主要依靠的是接头自身形成的毛细吸力,确保钎料填充进缝隙。但是,如果没有遵照正确的步骤,即使很好设计的接头也有可能质量无法保证。钎焊的基本步骤就是下面我们要介绍的六大内容。 如何进行钎焊?遵循下面的六大基本步骤,可以得到稳定,可重复的钎焊质量、强度、气密性、和可靠性。这些步骤通常比较简单,有些可能几分钟就可以完成,但是漏掉其中的任何一项,可能都会影响接头强度、外观和气密性等。 钎焊基础六大步骤主要包括: · 很好的配合和合适的间隙 · 清洁金属表面 · 合适的钎剂/气氛 · 合适的装夹 · 适宜的加热方式 · 焊后清洗 后续会分别对钎焊基础六大步骤进行解释说明,说明时,我们会以手工钎焊为例。但是所有手工钎焊中的解释说明,同样适用于大批量生产。虽然实现的方式可能不同,但是相同的步骤都应该遵循。 Brazing, as we’ve seen, uses the principle of capillary action to distribute the molten filler metal between the surfaces of the base metals. Therefore, during the brazing process, you should take care to maintain a clearance between the base metals to allow capillary action to work most effectively. This means, in almost all cases— a close clearance. The following chart is based on brazing butt joints of stainless steel, using Easy-Flo® filler metal. It shows how the tensile strength of the brazed joint varies with the amount of clearance between the parts being joined. Note that the strongest joint (135,000 psi/930.8 MPa) is achieved when the jointclearance is .0015” (.038mm.) When the clearance is narrower than this, it’s harder for the filler metal to distribute itself adequately throughout the entire joint and joint strength is reduced. Conversely, if the gap is wider than necessary, the strength of the joint will be reduced almost to that of the filler metal itself. Also, capillary action is reduced, so the filler metal may fail to fill the joint completely again lowering joint strength. So the ideal clearance for a brazed joint, in the example above, is in the neighborhood of .0015” (.038mm.) But in ordinary day-to-day brazing, you don’t have to be this precise to get a sufficiently strong joint. Capillary action operates over a range of clearances, so you get a certain amount of leeway. Look at the chart again, and see that clearances ranging from .001” to .005” (.025 mm to .127 mm) still produce joints of 100,000 psi (689.5 MPa) tensile strength. If you’re joining two flat parts, you can simply rest one on top of the other. The metal-to-metal contact is all the clearance you’ll usually need, since the average “mill finish” of metals provides enough surface roughness to create capillary “paths” for the flow of molten filler metal. (Highly polished surfaces, on the other hand, tend to restrict filler metal flow.) However, there’s a special factor you should consider carefully in planning your joint clearances. Brazed joints are made at brazing temperatures, not at room temperature. So you must take into account the “coefficient of thermal expansion” of the metals being joined. This is particularly true of tubular assemblies in which dissimilar metals are joined. As an example, let’s say you’re brazing a brass bushing into a steel sleeve. Brass expands, when heated, more than steel. So if you machine the parts to have a room temperature clearance of .002”-.003” (.051 mm-.076 mm), by the time you’ve heated the parts to brazing temperatures the gap may have closed completely! The answer? Allow a greater initial clearance, so that the gap at brazing temperature will be about .002”-.003” (.051 mm-.076 mm.). Of course, the same principle holds in reverse. If the outer part is brass and the inner part steel, you can start with virtually a light force fit at room temperature. By the time you reach brazing temperature, the more rapid expansion of the brass creates a suitable clearance. Capillary action will work properly only when the surfaces of the metals are clean. If they are “contaminated”—coated with oil, grease, rust, scale or just plain dirt—those contaminants have to be removed. If they remain, they will form a barrier between the base metal surfaces and the brazing materials. An oily base metal, for example, will repel the flux, leaving bare spots that oxidize under heat and result in voids. Oil and grease will carbonize when heated, forming a film over which the filler metal will not flow. And brazing filler metal won’t bond to a rusty surface. Cleaning the metal parts is seldom a complicated job, but it has to be done in the right sequence. Oil and grease should be removed first, because an acid pickle solution aimed to remove rust and scale won’t work on a greasy surface. (If you try to remove rust or scale by abrasive cleaning before getting rid of the oil, you’ll wind up scrubbing the oil, as well as fine abrasive powder, more deeply into the surface.) Start by getting rid of oil and grease. In most cases you can do it very easily either by dipping the parts into a suitable degreasing solvent, by vapor degreasing, or by alkaline or aqueous cleaning. If the metal surfaces are coated with oxide or scale, you can remove those contaminants chemically or mechanically. For chemical removal, use an acid pickle treatment, making sure that the chemicals are compatible with the base metals being cleaned, and that no acid traces remain in crevices or blind holes. Mechanical removal calls for abrasive cleaning. Particularly in repair brazing, where parts may be very dirty or heavily rusted, you can speed the cleaning process by using a grinding wheel, or file or metallic grit blast, followed by a rinsing operation. Once the parts are thoroughly clean, it’s a good idea to flux and braze as soon as possible. That way, there’s the least chance for recontamination of surfaces by factory dust or body oils deposited through handling. Why Brazing Requires Flux? Flux is a chemical compound applied to the joint surfaces before brazing. Its use, with a few exceptions, is crucial in the atmospheric brazing process. Heating a metal surface accelerates the formation of oxides, the result of chemical combination between the hot metal and oxygen in the air. If you don't stop these oxides from forming, they'll inhibit the brazing filler metal from wetting and bonding to the surfaces. A coating of flux on the joint area guards the surfaces from the air, preventing oxide formation. It also dissolves and absorbs any oxides that form throughout heating or that were not completely removed in the cleaning process. Understanding the functions and stages of flux will help you achieve strong, quality joints in your operation. Flux Application You can apply flux as long as you cover the joint surfaces completely. Flux traditionally is made in a paste, so it's usually most convenient to brush it on. But as production quantities increase, it may be more effective to apply the flux by dipping or dispensing a pre-measured deposit of high-viscosity dispensable flux from an applicator gun. Why dispensable flux? Many companies find the repeatable deposit size improves joint consistency, and because typically less flux is used, the amount of residue entering the waste stream is also reduced. When do you flux and how do you choose? Typically just before brazing, if possible. That way the flux has least chance to dry out and fake off, or get knocked off the parts in handling. Which flux do you use? Choose the one formulated for the specific metals, temperatures and conditions of your brazing application. There are fluxes formulated for practically every need; for example - fluxes for brazing at very high temperatures (in the 2000°F/1093°C area), fluxes for metals with refractory oxides, fluxes for long heating cycles, and fluxes for dispensing by automated machines. The addition of metallic boron changes white flux to black. Black flux is beneficial for fast induction heating, may provide better protection in a hightemperature brazing operation, and can be helpful with high-liquidus filler metals. Boron-modified black flux can help ensure a successful braze joint when brazing large parts over an extended period of heating time, or with base materials that require extra care to reduce tenacious oxides. Lucas Milhaupt's technical staff demonstrates the difference between white versus black flux in this video. Fortunately for your inventory, general-purpose fluxes, such as Handy & Harman's Handy Flux, are suitable for most typical brazing jobs. How much flux do you use? Enough to last throughout the entire heating cycle. Keep in mind that the larger and heavier the pieces brazed, the longer the heating cycle will take - so use more flux. (Lighter pieces, of course, heat up faster and require less flux.) As a general rule, don't skimp on the flux. It's your insurance against oxidation. Think of the flux as a sort of blotter. It absorbs oxides like a sponge absorbs water. An insufficient amount of flux will quickly become saturated and lose its effectiveness. A flux that absorbs less oxides not only insures a better joint than a totally saturated flux, but it is a lot easier to wash off after the brazed joint is completed. Flux can also act as a temperature indicator, minimizing the chance of overheating the parts. Handy & Harman's Handy Flux, for example, becomes completely clear and active at 1100°F/593°C. At this temperature, it looks like water and reveals the bright metal surface underneath - telling you that the base metal is just about hot enough to melt the brazing filler metal. Fluxing is an essential step in the brazing operation, aside from a few exceptions. You can join copper to copper without flux, by using a brazing filler metal specially formulated for the job, such as Handy & Harman's Sil-Fos or Fos-Flo 7. (The phosphorus in these alloys acts as a fluxing agent on copper.) You can also omit fluxing if brazing occurs in a controlled atmosphere (i.e. a gaseous mixture contained in an enclosed space, usually a brazing furnace). The atmosphere (such as hydrogen, nitrogen or dissociated ammonia) completely envelops the assemblies and, by excluding oxygen, prevents oxidation. Even in controlled atmosphere brazing you may find that a small amount of flux improves the wetting action of the brazing filler metal. The parts of the assembly are cleaned and fluxed. Now you have to hold them inposition for brazing. Be sure they remain in correct alignment during the heatingand cooling cycles, so that capillary action can do its job. If the shape and weight of the parts permit, the simplest way to hold them together is by gravity. Or give gravity a helping hand by adding additional weight. (A cumbersome fixture that contacts the assembly broadly will conduct heat away from the joint area.) Use pinpoint and knife-edge design to reduce contact to the minimum. Try to use materials in your fixture that are poor heat conductors, such as stainless steel, Inconel or ceramics. Since these are poor conductors, they draw the least heat away from the joint. If you’re planning to braze hundreds of identical assemblies, think in terms of designing the parts themselves for self-support during the brazing process. At the initial planning stage, design mechanical devices that will accomplish this purpose, and that can be incorporated in the fabricating operation. Typical devices include crimping, interlocking seams, swaging, peening, riveting, pinning, dimpling or knurling. Sharp corners should be minimized in mechanically held assemblies; corners can impede capillary action and should be slightly rounded to aid the flow of filler metal. A simple mechanical holding device is the best, since its only function is to hold the parts together while the permanent joint is made by brazing. Fixture Facts A fixture is built to cradle, hold or secure an assembly to be joined. Proper fixtures should meet these criteria: >> Allow easy insertion of assembly components and easy removal of the brazed assembly >> Support assembly components to permit expansion and contraction during heating and cooling >> Support the assembly at points away from the heat zone (preventing the fixture from becoming a heat sink) >> Permit the flame to be directed around the entire joint area, so the alloy can flow throughout the joint >> Use gravity to assist capillary action >> Maintain alignment and dimensional stability until the alloy solidifies >> Be sufficiently flexible to accommodate other similar assemblies Better Joint Design An axiom of metal joining is that proper joint design is the path to efficient fixturing. Brazing experts at Lucas Milhaupt offer these tips for improving your joint design: >> Make component pieces of the assembly self locating, so the fixture only supports and cradles the components. >> Allow space for the filler metal to flow and for flux to be forced out of the joint. Example Problem: Where a tube enters a fitting or casting, some manufacturers use a press fit to keep externally applied alloy from reaching the bottom of the joint, where it might plug a hole in the fitting. Unfortunately, molten flux reaches the bottom of the blind hole and is trapped there, as alloy melts and tries to enter the joint. The alloy cannot displace the flux, so heavy flux inclusions andpoor joint quality result. Example Solution: Use a slip fit and a buried preform in the hole. The alloy is induced by heat to flow to the top of the joint, pushing the flux out. This leaves the hole open and results in a sound joint. Take into account the expansion and contraction characteristics of the metals being joined. If possible, design the joint so the higher-expansion material is the outer member of the joint. (It will expand more than the inner member, providing clearance where the filler metal will flow.) Silver brazing is a cost-effective method for joining metals, especially when joints are designed for maximum brazing efficiency and fixtures are designed as described. Many products manufactured today could be redesigned for brazing to reduce manufacturing costs. Even though silver is expensive, it represents a small percentage of total assembly costs. Fixturing Tips Lucas Milhaupt engineers offer these ideas for improving manufacturing efficiency with fixturing: >> Construct fixtures from 300-series, non-magnetic stainless steel for better corrosion resistance and dimensional stability (other ideas include Inconel and some ceramics). >> When fixturing for furnace brazing, hold the mass of the fixture to aminimum. (Payoff is dependent on lb/hr through the furnace; increased weight = reduced fuel efficiency.) >> When fixturing for induction heating, keep fixtures away from the work coil, so they will not act as heat sinks or interfere with the magnetic field. >> Avoid use of springs for bringing parts back to dimensional alignment. If they are required, keep them out of the heat zone, so they will not be affected by flux residue or oxidation. Fixture design is a key factor in achieving quality flame-brazed or soldered joints. In addition, proper joint design is the path to efficient fixturing. Combining improvements to both these areas can result in better-quality joints, increase operating efficiency and reduce costs. The fifth step is the actual accomplishment of the brazing joint. It involves heating the assembly to brazing temperature, and flowing the filler metalthrough the joint. Brazing Heating Methods There are four main types of brazing heating methods: torch or manual brazing, induction brazing, resistance brazing, and vacuum brazing. The heating method most commonly used in brazing a single assembly is the hand held torch, therefore most of this guide will focus on manual brazing practices and principles. However, if you need assistance with furnace brazing, please see our furnace atmosphere blog. First, apply heat broadly to the base metals. If you’re brazing a small assembly, you may heat the entire assembly to the flow point of the brazing filler metal. If you’re brazing a large assembly, you heat a broad area around the joint. All you have to keep in mind is that both metals in the assembly should be heated as uniformly as possible so they reach brazing temperature at the same time. When joining a heavy section to a thin section, the “splash-off” of the flame may be sufficient to heat the thin part. Keep the torch moving at all times. When joining heavy sections, the flux may become transparent—which is at 1100°F (593°C)—before the full assembly is hot enough to receive the filler metal. In torch brazing, a variety of fuels are available—natural gas, acetylene, propane, propylene, etc., combusted with either oxygen or air. The most popular is still the oxy/acetylene mixture. When it comes to safely brazing with oxy-acetylene torches, let's look at two important aspects: safety equipment, plus procedures for safe operation. This is serious business: arc rays and sparks can result in loss of sight, fume inhalation can lead to lung damage, and other accidents can cause burns, fires, or explosions. Oxy-acetylene Torch Safety Equipment In addition to gloves, eye protection, and related safety gear, these are the important elements: Cylinders - Oxygen and acetylene are kept in separate cylinders and not combined until the torch tip is ignited. Oxygen cylinders, typically painted green, contain oxygen compressed up to 2,200 psi (pounds per square inch). Oxygen is a stable compound by nature, but any oil or grease which comes in contact with the oxygen will burst into flames. Therefore, keep hands and gloves free of these materials before handling cylinders. Acetylene gas cylinders are compressed at only about 250 psi, which is much lower than oxygen tanks. However, unlike oxygen, acetylene is rather unstable and, therefore, should not be introduced into the torch above 15 psi. As an extra precaution, cylinder valves should be open no more than 1.5 turns, in the event an operator must close a valve quickly. Regulators - Installed on the cylinder, regulators control both the pressure of the cylinder and the outlet pressure leading to the torch. Turn keys or knobs on the regulators allow adjustment of the outlet pressure. Again, the setting should be no more than 15 psi for acetylene. Consult the torch manufacturer for proper pressure settings for acetylene and oxygen. Check Valves - From the regulator, the two gases travel through check valves, which ensure that the gases can be shut off in the event of backflow. Alternatively, check valves can be placed between the gas hoses and the torch. Please note that check valves can stop reverse gas flow, but they cannot stop flame in the event of a flashback. Flashback Arrestors - Flashback arrestors prevent fire from flowing back into the cylinders, which will otherwise lead to an explosion. Flashback arrestors contain cut-off valves with low melting points. When triggered by flame, they readily shut off the gas supply and thus extinguish the flame. Both check valves and flashback arrestors should be tested or changed regularly to ensure they are working properly. Oxy-acetylene Torch Safe Operation In addition to using safety equipment, workers should practice safe operation to prevent flashbacks. Keep acetylene and oxygen separate until the torch is ignited. When starting a torch, the acetylene valve should be opened first. Next, the torch should be ignited, and then oxygen can be introduced. Please note that opening both gas valves prior to ignition can cause gas backflow into either gas hose, leaving the system vulnerable to flashback. After use, it is critical that both gas lines be emptied separately-one at a timethrough the torch. If this "bleeding" of gas lines is done simultaneously for oxygen and acetylene, any pressure difference between the gas lines will cause backflow of one gas into the other line, so this should be avoided. Flashbacks can also be caused by brazing with multiple torches, simultaneously, on one part. If using dual torches to heat both sides of a part, do not aim the torches at each other, but rather, angle each torch toward the part. If one torch should cause flashback in the other, operators will hear a loud hissing sound and should immediately turn off the gas by closing first the acetylene valve and then the oxygen valve. Flux Changes During Brazing Process Some metals are good conductors—and consequently carry off heat faster into cooler areas. Others are poor conductors and tend to retain heat and overheat readily. The good conductors will need more heat than the poor conductors, simply because they dissipate the heat more rapidly. In all cases, your best insurance against uneven heating is to keep a watchful eye on the flux. If the flux changes in appearance uniformly, the parts are being heated evenly, regardless of the difference in their mass or conductivity. Depositing Filler Metals You’ve heated the assembly to brazing temperature. Now you are ready to deposit the filler metal. In manual brazing, all this involves is carefully holding the rod or wire against the joint area. The heated assembly will melt off a portion of the filler metal, which will instantly be drawn by capillary action throughout the entire joint area. You may want to add some flux to the end of the ller metal rod— about 2” to 3” (51 mm to 76 mm)— to improve the flow. This can be accomplished by either brushing on or dipping the rod in flux. On larger parts requiring longer heating time, or where the flux has become saturated with much oxide, the addition of fresh flux on the filler metal will improve the flow and penetration of the filler metal into the joint area. However, there is one small precaution to observe. Molten brazing filler metal tends to flow toward areas of higher temperature. In the heated assembly, the outer base metal surfaces may be slightly hotter than the interior joint surfaces. So take care to deposit the filler metal immediately adjacent to the joint. If you deposit it away from the joint, it tends to plate over the hot surfaces rather than flow into the joint. In addition, it’s best to heat the side of the assembly opposite the point where you’re going to feed the filler metal. In the example above, you heat the underside of the larger plate, so that the heat draws the filler metal down fully into the joint. (Always remember—the filler metal tends to flow toward the source of heat.) General Safety In Brazing In brazing, there is always the possibility of dangerous fumes and gases rising from base metal coatings, zinc and cadmium-bearing filler metals, and from fluorides in fluxes. The following well-tested precautions should be followed to guard against any hazard from these fumes. 1. Ventilate confined areas: Use ventilating fans and exhaust hoods to carry all fumes and gases away from work, and air supplied respirators as required. 2. Clean base metals thoroughly: A surface contaminant of unknown composition on base metals may add to fume hazard and may cause a too rapid breakdown of flux, leading to overheating and fuming. 3. Use sufficient flux: Flux protects base metals and filler metal during the heating cycle. Full flux coverage reduces fuming. Also, consult your SDS regarding specific hazards associated with brazing flux. 4. Heat metals broadly: Heat the base metals broadly and uniformly. Intense localized heating uses up flux, increases danger of fuming. Apply heat only to base metals, not to filler metal. (Direct flame on filler metal causes overheating and fuming. 5. Know your base metals: A cadmium coating on a base metal will volatilize and produce toxic fume during heating. Zinc coatings (galvanized) will also fume when heated. Learn to recognize these coatings. It is recommended that they be removed before parts are heated for brazing. 6. Know your filler metal: Be especially careful not to overheat assembly when using filler metals that contain cadmium. Consult Pages 34-37 or the Safety Data Sheet (SDS) for maximum recommended brazing temperatures of a specific filler metal. The filler metal carries a warning label. Be sure to look for it and follow the instructions carefully. After you’ve brazed the assembly, you have to clean it. And cleaning is usually a two-step operation. First— removal of the ux residues. Second— pickling to remove any oxide scale formed during the brazing process. Flux Removal Flux removal is a simple, but essential operation. (Flux residues are chemically corrosive and, if not removed, could weaken certain joints.) Since most brazing fluxes are water soluble, the easiest way to remove them is to quench the assembly in hot water (120°F/50°C or hotter). Best bet is to immerse them while they’re still hot, just making sure that the filler metal has solidified completely before quenching. The glass-like flux residues will usually crack and flake off. If they’re a little stubborn, brush them lightly with a wire brush while the assembly is still in the hot water. Depending on your brazing process, you may need to perform post-braze joint cleaning to remove residual flux. This step can be crucial since most fluxes are corrosive, such as the pictured refrigeration line corrosion. Reasons to Remove Flux Let's examine five reasons why post-braze flux removal is important: 1. You cannot inspect a joint that is covered with flux. 2. Flux can act as a bonding agent and may be holding the joint together, without successful brazing. This joint would fail during service. 3. In pressure service, flux may mask pinholes in a braze joint, even though it withstands a pressure test. The joint would leak soon after being placed into service. 4. Flux is hygroscopic, so residual flux attracts available water from the environment. This leads to corrosion. 5. Paint or other coatings do not stick to areas covered with residual flux. Methods for Flux Removal After brazing, flux forms a hard, glass-like surface and can be difficult to remove. What is the best cleaning method? You can remove excess flux by various means; the most cost-effective approaches involve water. Industry flux standards focus on water-based fluxes. AMS 3410 and AMS 3411 stipulate that all fluxes conforming to these specifications should be soluble in water at 175°F/79°C or less after brazing. Therefore, brazing fluxes are typically designed to dissolve in water. The most common methods for post-braze flux removal are: Soaking/wetting Use hot water with agitation in a soak tank to remove excess flux immediately following the braze operation, and then dry the assembly. When soaking is not possible, use a wire brush along with a spray bottle or wet towel. When using a soak bath of any kind, change the solution periodically to avoid saturating the cleaning solution. Quenching This process induces a thermal shock that cracks off residual flux. When quenching a brazed part in hot water, take care to avoid compromising the braze joint. Quench only after the braze filler metal has solidified to avoid cracks or rough braze joints. Note that quenching can affect base material mechanical properties. Do not quench materials with large differences in coefficients of thermal expansion to avoid cracks in the base materials and tears within the braze alloy. You can use more elaborate methods of removing flux as well—an ultrasonic cleaning tank to speed the action of the hot water, or live steam. Additional cleaning methods include: >> Steam lance cleaning - This process employs superheated steam under pressure to dissolve and blast away flux residue. >> Chemical cleaning - You can use an acidic or basic solution, generally with short soak times to avoid deteriorating the base materials. For chemical soaks, monitor the pH level to determine when to change the solution. >> Mechanical cleaning - Clean residue from brazed joints with a wire brush or by sandblasting. Be advised that soft metals-including aluminum-require extra care, as they are vulnerable to the embedding of particles. Always ensure that your cleaning method is compatible with base metal properties. Some metal groups achieve a desired effect from a special treatment after cleaning. Stainless-steel and aluminum parts, for example, may benefit from chemical immersion to improve surface corrosion resistance. The only time you run into trouble removing flux is when you haven’t used enough of it to begin with, or you’ve overheated the parts during the brazing process. Then the flux becomes totally saturated with oxides, usually turning green or black. In this case, the flux has to be removed by a mild acid solution. A 25% hydrochloric acid bath (heated to 140-160°F/60-70°C) will usually dissolve the most stubborn flux residues. Simply agitate the brazed assembly in this solution for 30 seconds to 2 minutes. No need to brush. A word of caution, however—acid solutions are potent, so when quenching hot brazed assemblies in an acid bath, be sure to wear a face shield and gloves. After you’ve gotten rid of the flux, use a pickling solution to remove any oxides that remain on areas that were unprotected by flux during the brazing process. The best pickle to use is generally the one recommended by the manufacturer of the brazing materials you’re using. Highly oxidizing pickling solutions, such as bright dips containing nitric acid, should be avoided if possible, as they attack the silver filler metal. If you do find it necessary to use them, keep the pickling time very short. Post-Cleaning Inspection of Brazed Joints Depending on your brazing process, you may need to perform post-braze joint cleaning to remove residual flux. This step is crucial for several reasons; including the corrosive nature of most fluxes and the possibility that excess flux could contribute to joint failure. The most common cleaning methods involve water-specifically soaking/wetting and quenching. Discontinuities During Joint Inspection Examining finished joints may be the final step in the brazing process, but inspection procedures should be incorporated into the design stage. Your methodology will depend on the application, service and end-user requirements plus regulatory codes and standards. Define your acceptance criteria for any discontinuity with considerations for shape, orientation, location (surface or subsurface) and relationship to other discontinuities. Be sure to state acceptance limits in terms of minimum requirements. Common discontinuities of brazed joints, identified through nondestructive examination, include: >> Voids or porosity - an incomplete flow of brazing filler metal which can decrease joint strength and allow leakage-often caused by improper cleaning, incorrect joint clearance, insufficient filler metal, entrapped gas or thermal expansion. >> Flux entrapment - resulting from insufficient vents in the joint designpreventing the flow of filler metal and reducing joint strength as well as service life >> Discontinuous fillets - areas on the joint surface where the fillet is interrupted-usually discovered by visual inspection >> Base metal erosion (or alloying) - when the filler metal alloys with the base metal during brazing-movement of the alloy away from the fillet may cause erosion and reduce joint strength >> Unsatisfactory surface condition or appearance - excessive filler metal or rough surfaces-may act as corrosion sites and stress concentrators, also interfering with further testing >> Cracks - reducing strength and service life of the joint-may also be causedby liquid metal embrittlement.

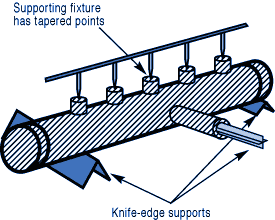 If you have a number of assemblies to braze and their configuration is too complex for self-support or clamping, use a brazing support fixture. Design it for the least possible mass, and the least contact with the parts of the assembly.
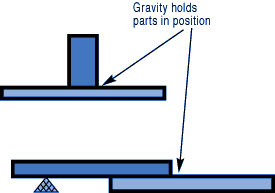 Choose materials with compatible expansion rates so you won’t get alterations in assembly alignment during the heating cycle.