
钎焊基本原理
您遇到钎焊方面的问题吗?或需要我们推荐合适的钎焊产品吗?欢迎和我们联系!
鲁科斯钎焊材料(苏州)有限公司
中国 江苏省苏州市苏州工业园区星龙街428号苏春工业坊标准厂房8B
手 机:18862195523
Email:ABian@lucasmilhaupt.com WeChat:bxc615
手 机:13580355062
Email: KCheng@lucasmilhaupt.com
手 机:18660285329
Email:Lli@lucasmilhaupt.com
手 机:13512375105
Email:WWei@lucasmilhaupt.com
电话:15862440316
Email:Jxia@lucasmilhaupt.com
电 话:0512-62891510-215
Email:CFang@lucasmilhaupt.com
After you’ve brazed the assembly, you have to clean it. And cleaning is usually a two-step operation. First— removal of the ux residues. Second— pickling to remove any oxide scale formed during the brazing process.
Flux Removal
Flux removal is a simple, but essential operation. (Flux residues are chemically corrosive and, if not removed, could weaken certain joints.) Since most brazing fluxes are water soluble, the easiest way to remove them is to quench the assembly in hot water (120°F/50°C or hotter). Best bet is to immerse them while they’re still hot, just making sure that the filler metal has solidified completely before quenching. The glass-like flux residues will usually crack and flake off. If they’re a little stubborn, brush them lightly with a wire brush while the assembly is still in the hot water.
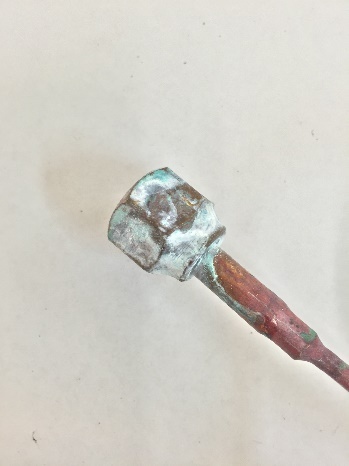
Depending on your brazing process, you may need to perform post-braze joint cleaning to remove residual flux. This step can be crucial since most fluxes are corrosive, such as the pictured refrigeration line corrosion.
Reasons to Remove Flux
Let's examine five reasons why post-braze flux removal is important:
1. You cannot inspect a joint that is covered with flux.
2. Flux can act as a bonding agent and may be holding the joint together, without successful brazing. This joint would fail during service.
3. In pressure service, flux may mask pinholes in a braze joint, even though it withstands a pressure test. The joint would leak soon after being placed into service.
4. Flux is hygroscopic, so residual flux attracts available water from the environment. This leads to corrosion.
5. Paint or other coatings do not stick to areas covered with residual flux.
Methods for Flux Removal
After brazing, flux forms a hard, glass-like surface and can be difficult to remove. What is the best cleaning method? You can remove excess flux by various means; the most cost-effective approaches involve water.
Industry flux standards focus on water-based fluxes. AMS 3410 and AMS 3411 stipulate that all fluxes conforming to these specifications should be soluble in water at 175°F/79°C or less after brazing. Therefore, brazing fluxes are typically designed to dissolve in water.
The most common methods for post-braze flux removal are:
Soaking/wetting
Use hot water with agitation in a soak tank to remove excess flux immediately following the braze operation, and then dry the assembly. When soaking is not possible, use a wire brush along with a spray bottle or wet towel. When using a soak bath of any kind, change the solution periodically to avoid saturating the cleaning solution.
Quenching
This process induces a thermal shock that cracks off residual flux. When quenching a brazed part in hot water, take care to avoid compromising the braze joint. Quench only after the braze filler metal has solidified to avoid cracks or rough braze joints. Note that quenching can affect base material mechanical properties. Do not quench materials with large differences in coefficients of thermal expansion to avoid cracks in the base materials and tears within the braze alloy.
You can use more elaborate methods of removing flux as well—an ultrasonic cleaning tank to speed the action of the hot water, or live steam. Additional cleaning methods include:
>> Steam lance cleaning - This process employs superheated steam under pressure to dissolve and blast away flux residue.
>> Chemical cleaning - You can use an acidic or basic solution, generally with short soak times to avoid deteriorating the base materials. For chemical soaks, monitor the pH level to determine when to change the solution.
>> Mechanical cleaning - Clean residue from brazed joints with a wire brush or by sandblasting. Be advised that soft metals-including aluminum-require extra care, as they are vulnerable to the embedding of particles.
Always ensure that your cleaning method is compatible with base metal properties. Some metal groups achieve a desired effect from a special treatment after cleaning. Stainless-steel and aluminum parts, for example, may benefit from chemical immersion to improve surface corrosion resistance.
The only time you run into trouble removing flux is when you haven’t used enough of it to begin with, or you’ve overheated the parts during the brazing process. Then the flux becomes totally saturated with oxides, usually turning green or black. In this case, the flux has to be removed by a mild acid solution. A 25% hydrochloric acid bath (heated to 140-160°F/60-70°C) will usually dissolve the most stubborn flux residues. Simply agitate the brazed assembly in this solution for 30 seconds to 2 minutes. No need to brush. A word of caution, however—acid solutions are potent, so when quenching hot brazed assemblies in an acid bath, be sure to wear a face shield and gloves.
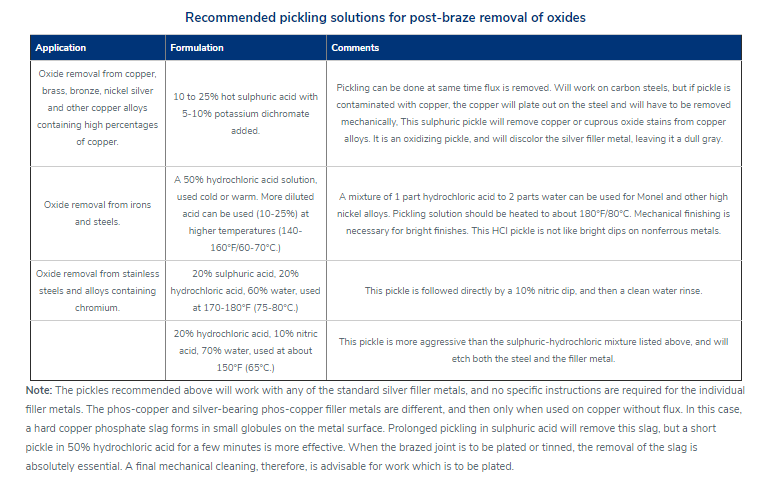
After you’ve gotten rid of the flux, use a pickling solution to remove any oxides that remain on areas that were unprotected by flux during the brazing process. The best pickle to use is generally the one recommended by the manufacturer of the brazing materials you’re using. Highly oxidizing pickling solutions, such as bright dips containing nitric acid, should be avoided if possible, as they attack the silver filler metal. If you do find it necessary to use them, keep the pickling time very short.
Post-Cleaning Inspection of Brazed Joints
Depending on your brazing process, you may need to perform post-braze joint cleaning to remove residual flux. This step is crucial for several reasons; including the corrosive nature of most fluxes and the possibility that excess flux could contribute to joint failure. The most common cleaning methods involve water-specifically soaking/wetting and quenching.
Discontinuities During Joint Inspection
Examining finished joints may be the final step in the brazing process, but inspection procedures should be incorporated into the design stage. Your methodology will depend on the application, service and end-user requirements plus regulatory codes and standards.
Define your acceptance criteria for any discontinuity with considerations for shape, orientation, location (surface or subsurface) and relationship to other discontinuities. Be sure to state acceptance limits in terms of minimum
requirements.
Common discontinuities of brazed joints, identified through nondestructive examination, include:
>> Voids or porosity - an incomplete flow of brazing filler metal which can decrease joint strength and allow leakage-often caused by improper cleaning, incorrect joint clearance, insufficient filler metal, entrapped gas or
thermal expansion.
>> Flux entrapment - resulting from insufficient vents in the joint designpreventing the flow of filler metal and reducing joint strength as well as service life
>> Discontinuous fillets - areas on the joint surface where the fillet is interrupted-usually discovered by visual inspection
>> Base metal erosion (or alloying) - when the filler metal alloys with the base metal during brazing-movement of the alloy away from the fillet may cause erosion and reduce joint strength
>> Unsatisfactory surface condition or appearance - excessive filler metal or rough surfaces-may act as corrosion sites and stress concentrators, also interfering with further testing
>> Cracks - reducing strength and service life of the joint-may also be causedby liquid metal embrittlement.